Apologies to my regular blog followers, but this post is primarily geared to an audience of fellow volunteers, to provide step-by-step instructions for making the water tank I've mentioned here before.
Ferrocement refers to a technique of making concrete structures with very thin but strong walls, by plastering a rich sand-cement mortar over a reinforcing framework of rebar or wire mesh, or chicken wire, etc. One great thing about ferrocement is that you can fabricate objects in just about any shape that you can form the mesh into, such as this basin that fits into a composting latrine seat for the improvised bidet described in an earlier post.

The tank is made by applying a sand-cement mortar over a cloth bag that has been stuffed with sawdust or chopped grass and wrapped with chicken wire. Once the cement hardens, the stuffing is removed and the bag is pulled out, leaving the finished tank. A lot like paper maché. The bag will be reusable for many tanks.

You make the bag by cutting out five coffin-shaped side panels from sturdy cloth- There is an inch of extra material all around the panel for the seams to overlap (two inches at the top). Sew the panels together side to side and then sew it all onto the circular bottom panel. Fold over the extra cloth at the top of each side panel and sew a little pocket for a drawstring to pull the bag tight at the top where the mouth of the tank will be.

. This sketch is for the eighty-five gallon tank, which is about as large a tank as you can easily move around (with help) once it's finished. If you need to provide more storage, two or more of these tanks can be plumbed in series by connecting their outlets. Only one tank will need an inlet for the rainwater. As long as the overflow level of the two tanks are at the same height.they will fill and drain together, maintaining equal water surface levels in each tank.
Once you have your bag, the first step in building the tank is to make the bottom plate which is cast in the shape of a shallow dome giving it extra strength to resist the weight of the water. You could dig out an area on the ground to cast the plate, but in my case it´s easier to bring the ground up to the porch where we can work in the shade and not expose the work in progress to the elements (including curious animals and children).
My porch slants pretty severely, so it takes a good bed of clay to level things up. A circle with a radius equal to that of the bottom panel of your bag is scratched into the clay by stretching a string from a center nail like a compass.
Roll up clay "snakes" and place them along the outside of the circle.

The bottom plate is 5/8 inch thick, so we used a 5/8 inch thick scrap of wood as a gauge to flatten and smooth the ring of clay. This forms a little wall that serves as the the form for the perimeter edge of the plate.


Here's how the form for casting the base plate looks when built one on a floor that doesn´t need a mud buildup to compensate for an uneven floor.

Once the form is ready, use plastic to line the form and shape some chicken wire to fit within it, leaving a few inches of extra wire sticking out all around. Shaping the chicken wire to lay reasonably flat over the dome takes some doing, but if you can get it pretty close, the wet mortar will help hold it down when you fill the form.
 The idea is that the chicken wire will end up centered the cement plate, with the extra chicken wire sticking out from the top, right along the outer edge. Once the chicken wire is ready, repair any damage to the form, making sure the wall is still smooth and even all the way around, with a sharp inside corner at the bottom.
Mix the mortar using two parts sand to one part cement and just enough water to make the mortar workable. Start filling the form along the perimeter, compacting the mortar as you go. The outer ring of clay will let you to get the thickness of the plate correct around the perimeter. Poke a nail into the wet cement to check the depth in the center as it slopes up into a dome to make sure that the plate has the same 5/8" thickness all the way across..

Cover the base plate with plastic and let it harden at least overnight before disturbing it. Once the plate is well set up leave it sitting on the clay form, but remove the outer ring of clay and pull the plastic down to expose the the edge of the plate. Clean up the edge, chipping away any excess cement where you might have overflowed the form, leaving a good flat edge.
The next step is to place the cloth bag on top of the base and fill it with stuffing. Sawdust is often used, but chopped grass also works very well if you carefully pack it in as you fill the bag to achieve the desired urn shape. You should pat and push the bag into shape as you fill it, stepping back and looking at it from all angles to avoid lopsidedness and unsightly bulges. Like most unsightly bulges, it's a lot easier to avoid getting them than it is to get rid of them later.

Fold the chicken wire that is sticking out of the base plate up onto the bag and then wrap a roll of chicken wire around the bag, overlapping the wire from the base, and tie it off with light gauge tie wire or with the cut ends of the chicken wire itself.. Because the shape of the bag is not a straight cylinder, it takes some reshaping to get the chicken wire laying smoothly over the bag, but the flexibility of chicken wire makes it possible. You can twist the wire together in spots to shrink the little hexagons until the chicken wire conforms to the curves of the bag. The wire doesn´t need to be squeezing real tightly onto the bag, but neither should there be any noticable gaps between the wire and the bag.


Trim off the extra chicken wire at the top of the bag and make several vertical cuts down from the top to form little flaps that can fold down flat onto the top of the bag. Make a ring of with several loops of thicker gauge tie wire. The ring should be the diameter that you want the neck of the tank's opening to be. Lay this ring of wire on top of the bag, pull the ends of the flaps of chicken wire up and out through the ring and fold them back down onto bag. Trim the excess from the flaps and use the thin wire to tie them off, centering the ring of wire where the mouth of the tank will be.
 This photo also shows a ring of garden hose that will serve as a form to plaster up against to make a neck at the opening of the jar. It should be around 3/8 inch wider than the ring of wire all around. The hose can be put aside until both coats of plaster have been applied.


The mortar is troweled on in two coats of 1/2 centimeter each, waiting a couple of hours in between coats. Two people or even three can be working at once, each working up their side of the tank.
With a fourth and fifth person keeping the mortar coming the work will go quickly which is all the better.
Start plastering from the bottom, using short, upward strokes with your trowel and firmly pressing the mortar enough to compact it well and squeeze it in behind the chicken wire. Be sure to get good thick coverage on the outer edge of the base plate all around and also get plenty of plaster around the plastic coupling. Systematically work your way up the tank, smearing on plaster in a small sections, packing it and smoothing it a little, then smearing on some more right next to it, keeping it all of an even thickness as you work your way around and up the tank. Don't overwork the plaster once it´s on the tank. You don't need a really smooth surface on this first coat. Just get an even coat all around. You will see the outline of the chicken wire in most places and that is fine for the first coat. Continue to the top, completely covering the ring of wire where the mouth of the jar will be.
Let the first coat start setting up for a couple of hours.
Before applying the second coat, carefully shave off any excess plaster that you find sticking out below the bottom of the base plate (Do this again after the second coat). Plaster the second coat just as you did the first, again with special attention around the base and around the outlet fitting. Work systematically from bottom to top so you don't lose track of where you've applied your second coat. Try to keep a consistent half centimeter thickness for the second coat, but when in doubt, be a little generous.
Once you've plastered up over the ring at the top you can set the loop of garden hose on top of the plaster and build up a little 3/4 inch neck of cement inside the hoop that will support the tank lid. You can make an extra loop of wire and imbed it in the plaster as you build it up to provide reinforcement for the neck. If you are going to make a lid for your tank you should take special pains to get the neck flat and level so the lid will sit evenly.

Once the plaster is firm to the touch, cover it completely with plastic and leave it alone. Keep the tank damp while you wait at least a three days before pulling out the stuffing and peeling the bag away from the inside of the tank. it is absolutely crucial that you not let the tank dry out during these few days. Clean out any loose plaster from the inside, moisten the inside walls, and then spread a thin coat of the mortar onto the inside of the tank making sure to cover up any exposed chicken wire. Give the joint where the tank wall meets the base plate a little extra thickness as well as around the pipe fitting. It's hard (impossible) to plaster the curved wall inside the tank with a trowel, and so you may end up using your hands a fair amount. Use rubber gloves. I'm told by another comarca PCV that a sponge or piece of upholstery foam works very well. The tank should be solid enough to lay down gently on its side which will make the work easier. Wrap it back up in plastic while this inside coat of mortar sets up. The final step is to mix up a slurry of portland cement and water to the consistency of melted ice cream. This "neat cement" is then brushed on and pressed in to the still damp inside walls of the tank. Now cover the tank again with plastic and keep it damp for at least two weeks to allow the slow curing necessary for cement to develop its full strength.
Clean out any loose plaster from the inside, moisten the inside walls, and then spread a thin coat of the mortar onto the inside of the tank making sure to cover up any exposed chicken wire. Give the joint where the tank wall meets the base plate a little extra thickness as well as around the pipe fitting. It's hard (impossible) to plaster the curved wall inside the tank with a trowel, and so you may end up using your hands a fair amount. Use rubber gloves. I'm told by another comarca PCV that a sponge or piece of upholstery foam works very well. The tank should be solid enough to lay down gently on its side which will make the work easier. Wrap it back up in plastic while this inside coat of mortar sets up. The final step is to mix up a slurry of portland cement and water to the consistency of melted ice cream. This "neat cement" is then brushed on and pressed in to the still damp inside walls of the tank. Now cover the tank again with plastic and keep it damp for at least two weeks to allow the slow curing necessary for cement to develop its full strength.
In the meantime you can cast a lid using the same clay technique used to make the base plate. (This step could also be done the same day you make the base plate) The hose you used to form up the neck of the jar can also serve to form the outer edge of the lid. Shape the contours of the clay so that your lid will have a flat ring that sits atop the jar's neck, and then has a deeper section that fits inside the neck and keeps the lid from being able to slide from side to side. You can mound up the center just as you did on the base plate to give the lid a domed shape that will shed water without being too thick.  We used a scrap of two inch PVC that we thermaformed into a bell to serve as a socket for connecting a rainwater downspout. Cut some notches that can be heated and pulled up to form little ears that will be embedded in the cement of the lid.
  Cover the finished form with plastic, insert the pipe socket and add some wire or chicken wire to give it some reinforcement and plaster up the lid with the same mortar as the tank.
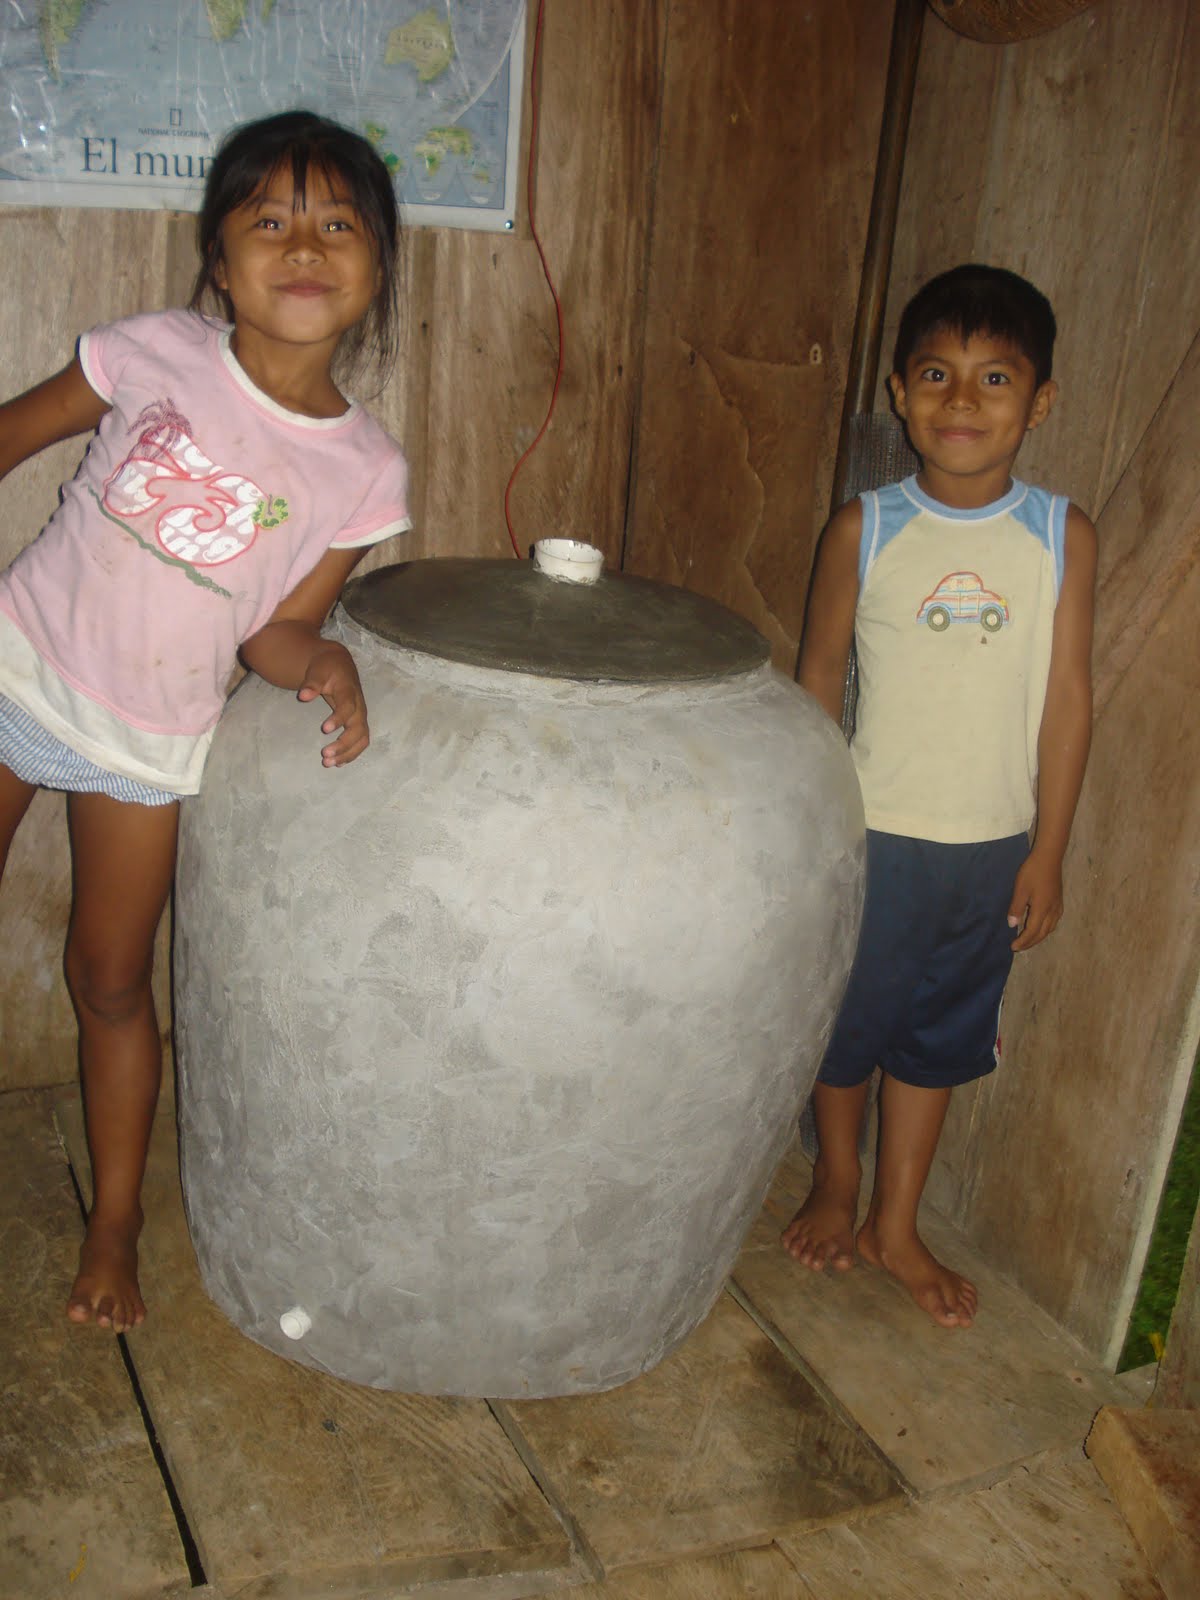
The result is a really beautiful tank. Made on site for a fraction of the cost of even a recycled plastic tank of similar size, it should last as long or longer. Since it remains completely dark inside it won't grow algae like plastic tanks tend to do. As you can see these tanks can be built with transferrable skills and relatively available and affordable materials, making it a more sustainable solution to household water storage needs. And for any of my regular, non Peace Corps readers who have read all the way to the end, you can try this at home!We used a scrap of two inch PVC that we thermaformed into a bell to serve as a socket for connecting a rainwater downspout. Cut some notches that can be heated and pulled up to form little ears that will be embedded in the cement of the lid. Cover the finished form with plastic, insert the pipe socket and add some wire or chicken wire to give it some reinforcement and plaster up the lid with the same mortar as the tank.