
 |
| Water committee chairman examines the spring at Naogugura |
The spring's only drawback as a water source is that its hillside location isn't actually all that much higher in elevation than the village itself. That presents a challenge for a gravity-flow water system, which has to rely strictly on the power of gravity to pressurize the pipeline in order to push water all the way into town and up to a tap. Because the source is not that high the system just won't have that much gravitational energy to start with. And what energy it starts out with will peter out pretty quickly if the water is running through pipes that are much too small and much too leaky, both prominent features of Marino's thirty-year-old pipeline.
When I first came to Marino there were only two public tap stands to supply water for the 125 people who live in the village center. There were also a handful of taps strung along the village outskirts where another 120 people live in their different family compounds. When I arrived I moved into the charming little Peace Corps house that the community had built behind the Health Dispensary which is at the edge of town and at the very end of the pipeline.
 |
| Volunteer grounds crew for the Dispensary in front of the Peace Corps house |
The Dispensary building had pipes running to a sink, a shower and even a flush toilet, but water hadn't actually reached any of them for many years. We had to carry all the water for the dispensary and for my own house from a nearby tank that would usually have enough water to fill our buckets. But everyone's taps regularly went dry. It was a matter of daily routine. That less than ideal situation was to become a lot worse not long after I moved in. In August of 2018, several dozen families who were fleeing the volcanic eruptions on the neighboring island of Ambae, were moved into temporary shelters, mostly in the village center. Our community's census, and the water demand, literally doubled overnight.
 |
| Evacuee housing |
As I described in an earlier post, the arrival of the evacuees from Ambae abruptly upended the routines of life all over Maewo. But it also turned out to be pivotal in the evolution of our community's water project. There was an immediate national and international response to the refugee crisis and along with standard humanitarian aid, several agencies sent resources for a "quick fix" of our dilapidated water system. That included materials to repair leaks in the old pipes and for building a new concrete intake structure at the spring. But the most consequential assistance (and by far the most expensive) was the new pipe we were given so we could upgrade the first few hundred meters of the pipeline, up-sizing the old 40 mm line to new 63 mm poly pipe.
 |
| Intake structure takes shape with the new 63 mm pipe connected |
Installing the larger pipe resulted in an immediate increase in the flow and water started arriving more consistently at the two public taps in the village center. That went a long way toward alleviating the immediate water crisis. But there still wasn't enough pressure in the system to get water up to a tap anywhere close to all the families who live in the upper part of the village. Our solution was to take a donated rainwater tank that was going unused and re-purpose it as a reservoir for that neighborhood.

We situated the tank on a rise at the top of the neighborhood and ran a small supply line up to it. Water only reached the tank sporadically and only during off-peak hours, but enough water trickled into the tank, especially overnight, to leave the tank at least half-full every morning. With that daily supply of water to work with we could run pipes from the tank back down the hill to four new public taps that community crews built around the neighborhood.

The effectiveness of those early upgrades to the system also provided some confirmation that our bigger plans were feasible. That is, if we could get enough large-gauge pipe to upgrade the rest of the mainline, the system could provide enough water to expand access to everyone. Confident that we were on the right track, the water committee worked out a plan to up-size the rest of the main pipeline and to begin adding new branch lines around the the village that could eventually carry water right to people's homes.
Through generous private donations to a PCPP grant we were able to buy another 600 meters of large pipe for the mainline and another 1,000 meters of smaller pipe for new branch lines. The grant process was surprisingly quick, but getting the pipe and all of the fittings purchased and transported back to Maewo proved to be quite a project in itself. During my first year in Vanuatu, any time I travelled back to the capital I had burned many an hour scouring hardware outlets to figure out where the materials we needed could be found and what it would all cost. I have to admit, the initial sticker shock really set me back. Below for example is that big pipe that we'd been lucky enough to receive through the government disaster response. That price in US Dollars is $13 per meter of pipe.

The good news was that prices can vary wildly and if you know where to look, you can find comparable materials at much better prices. But that also meant that once the grant funds came through, spending the money was never going to be a simple matter of one-stop shopping. And each stop would have to include a plan for getting things back to Maewo. I could carry some smaller items with me when I flew back but all those rolls of pipe would have to be sent on one of the two cargo ships that make periodic stops at Maewo.

By lucky timing, the good ship Makila happened to be in port that week. I negotiated a price with the ship's owner and saw everything down to wharf and onto the ship. The Makila arrived in Maewo a week later as scheduled, but despite the arrangement I'd made with the man in charge, known as the "Super-Cargo," they had dropped off several of the big rolls of pipe at a village down towards the southern end of the island, in the direction locals confusingly refer to as "on top." After some unnerving confusion about where the pipe had ended up we managed to hire a truck to bring the last of it to Marino.

We didn't have access to the kind of unspooling rig that would be brought to bear in an industrialized setting, and I was aware of the distinct possibility of a disastrous fiasco when working with the unwieldy, 150-meter-long coils of pipe by hand so we made sure to have all hands on deck for the work days we planned for installing the new pipe.

Lucky thing too. It took eight or ten guys just to handle the uncoiling of the pipe while a half dozen others pulled the lead end along through the dense undergrowth. They were led by still others hacking a path with their machetes.

We installed the new pipe along the same route as the existing pipeline, swapping out the old smaller gauge pipe in order to reuse it further downstream. So another work crew set about disconnecting the existing pipes and dragging them to their new downstream locations where they would replace a next-size-smaller pipe.

When all of the connections had finally been made and we released water into the pipeline the results were immediate and brought immense relief and satisfaction all around. Water flowed freely from taps that before had typically been dry or only produced a trickle.

Overhauling the mainline of the system went a long way toward meeting the water committee's fundamental mission: To assure that every household had a public tap within 25 meters of their home where they could reliably find clean water to fill their buckets and bottles. That standard is often the bottom-line metric of success for rural water projects in the developing world. That being said, I doubt there will be many readers of this blog who would be satisfied with that setup for their own household. I know I wouldn't.
Not to imply that access to water right inside the house, your kitchen sink for example, is just another labor-saving modern convenience. Running water is the fundamental tool for the hygiene routines that help keep us all healthy. Promoting those hygiene routines is a pillar of public health campaigns in Vanuatu, just like it is all over the world.
 |
| "Wasem gud han. Klin han hemi sevem laef" photo by E. Toka-Shing |
But there is one unfortunate disconnect. The public health education campaigns almost always focus on how to properly wash your hands using running water, despite the fact that so many people living in rural villages don't have a tap with running water available at home.
 |
| Handwashing guide in Bislama |
 |
| Hygiene education effort in Malawi |
When there's isn't any way to get water piped directly to a hand washing station, aid agencies often promote refillable buckets with a tap attached. Oxfam sent a lot of these buckets to Maewo as part of the disaster response.
 |
| photo from Oxfam Africa |
There is a simple homemade option that I wrote about in an earlier post, the humble but efficient "tippy-tap," which can provide hands-free running water as demonstrated below by the kids at my host family's house during our pre-service training on Pele Island.
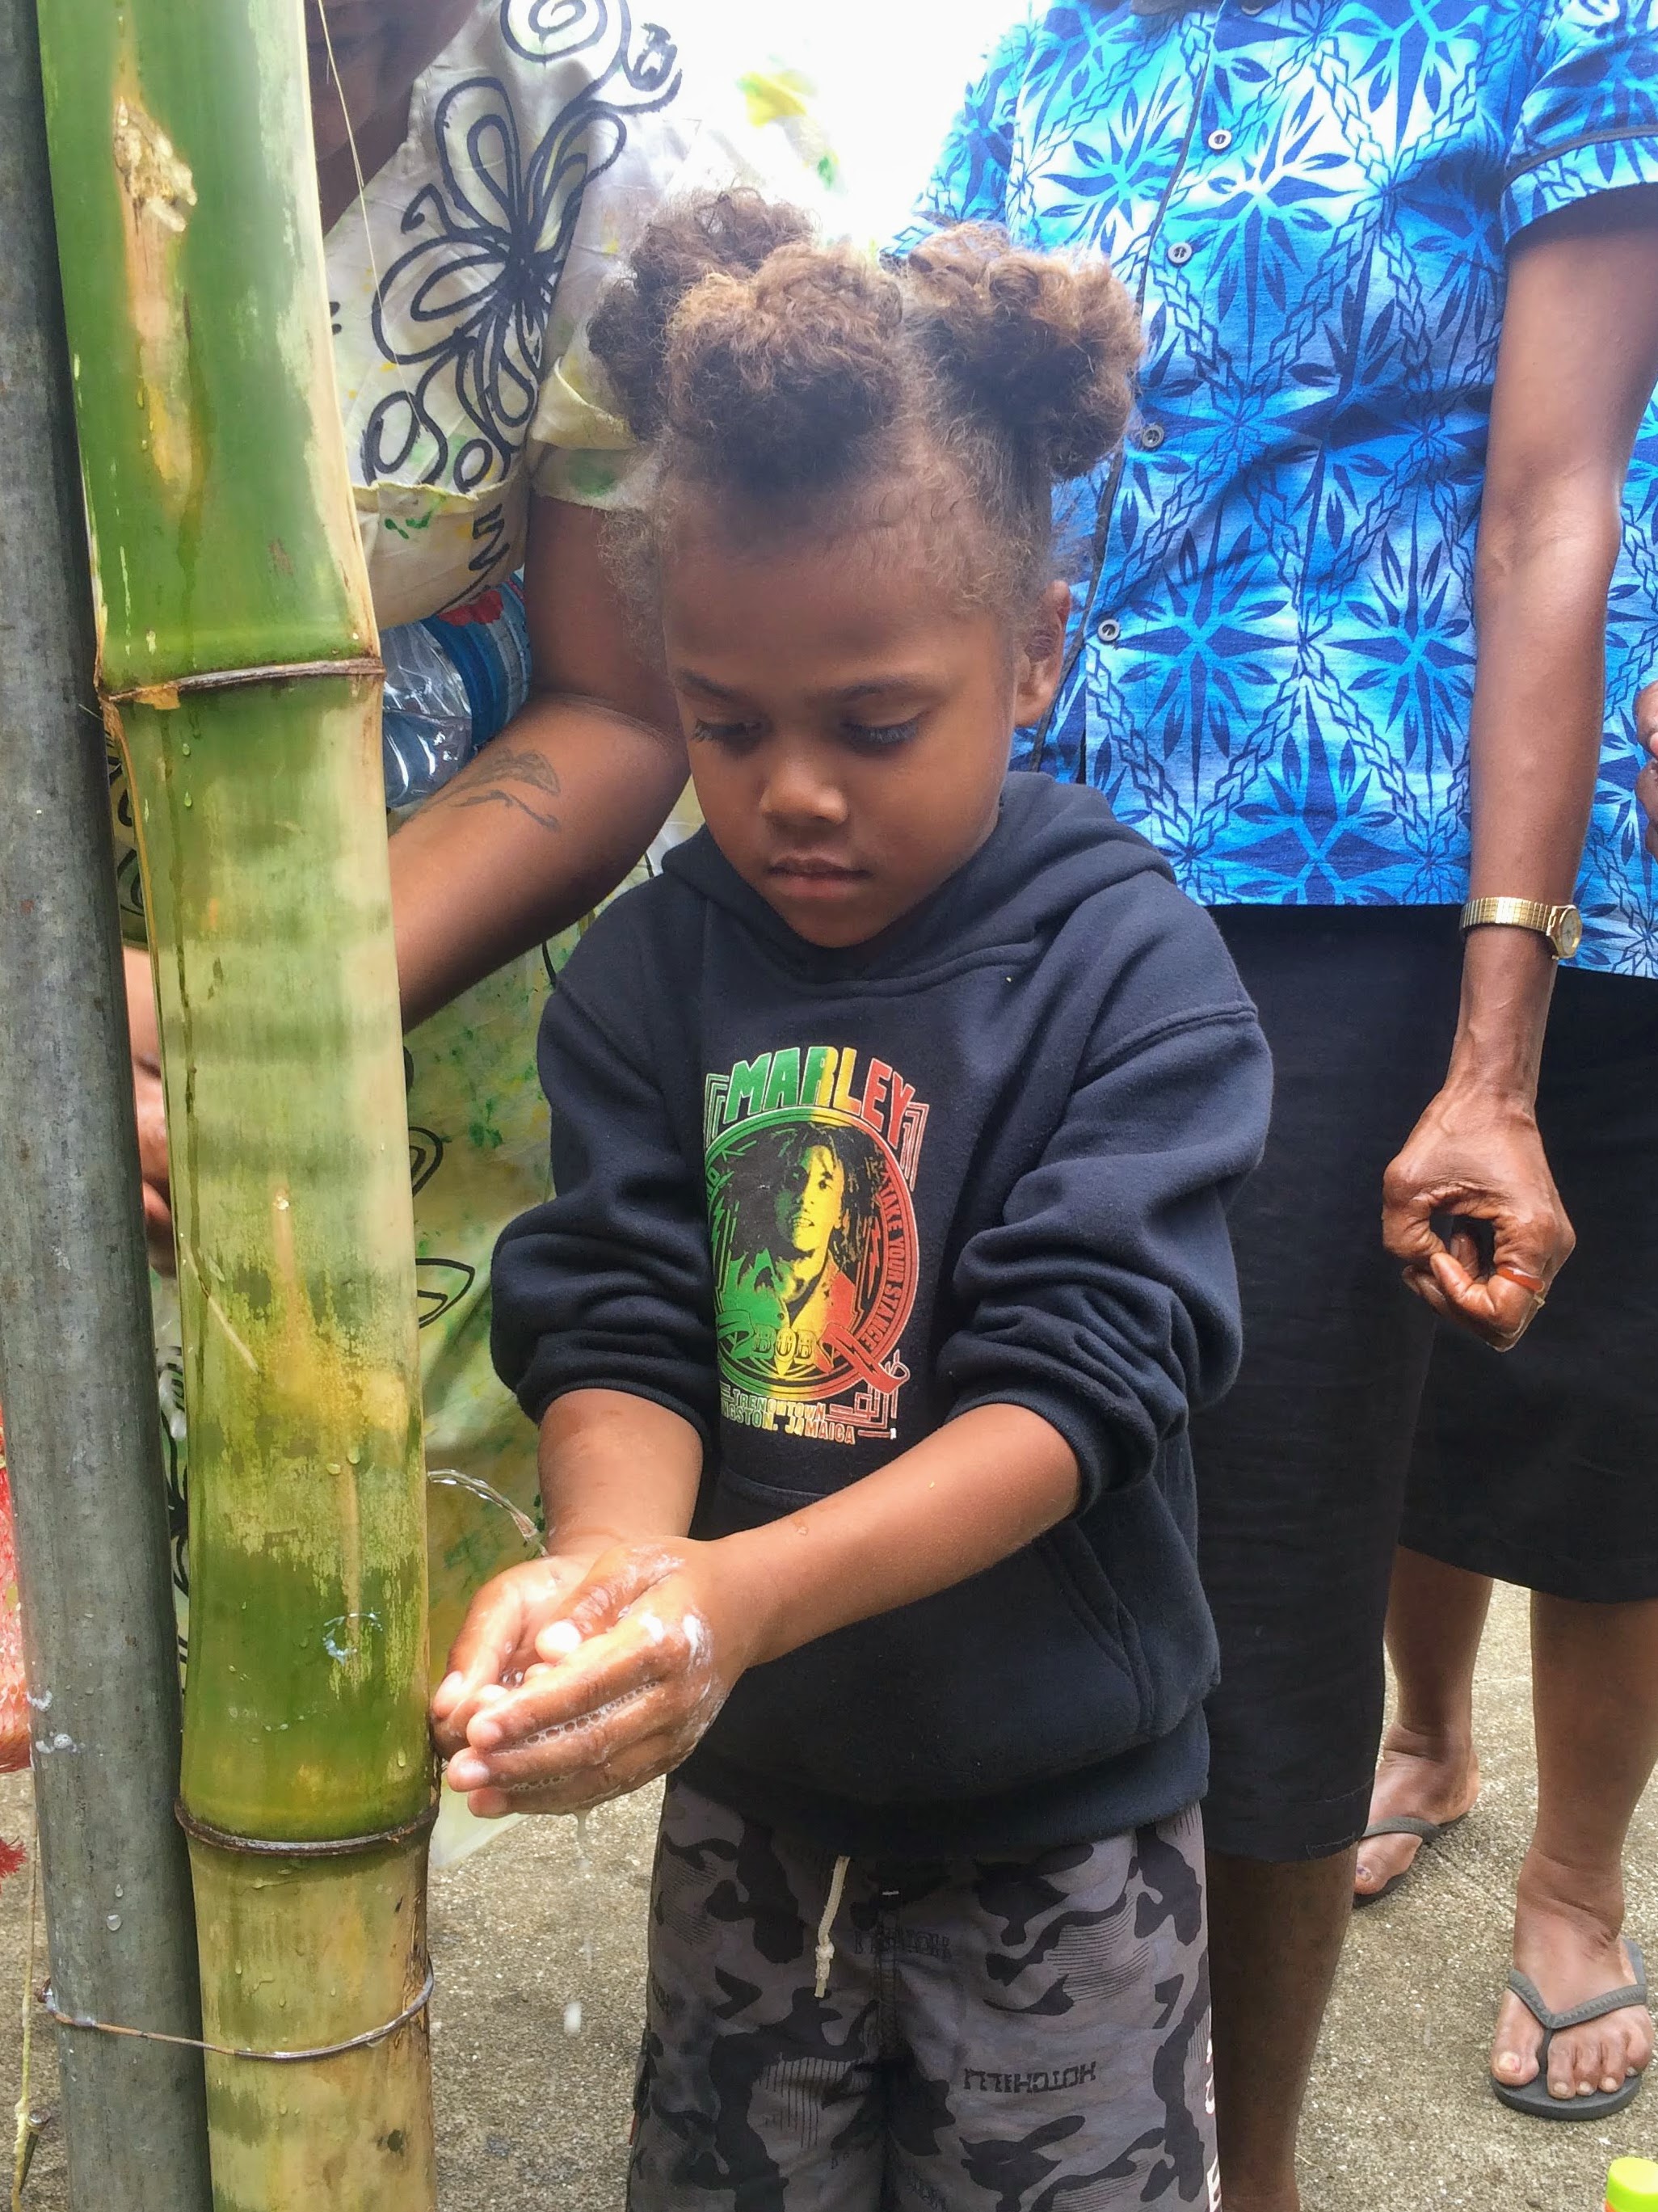
 |
And there's a clever local innovation using bamboo.
 |
| Demonstration at a Health Fair in Port Vila |
 |
| Helping out with dinner |
 |
| My host mom in her kitchen |
The family kitchen on Maewo is invariably a dark and smokey scene. The stark lack of modern amenities might strike an outsider as sad or even pitiful. A first impression could hardly get it more wrong! In Vanuatu the kitchen is where the heart of the family beats strongest--a place of communion and sustenance that elicits a sense of joy and security to anyone lucky enough to be welcomed into the family circle.
 |
| A Peace Corps Volunteer helps prepare naolat in her family's kitchen |
Starting with the collection of firewood, the preparation of food for the family is labor intensive beyond anything the most dedicated cook-from-scratch foodie in our society would even imagine. The staple foods and the techniques and kitchen tools used to prepare them haven't really changed substantially for generations.
 |
| On today's menu, crab. |
Village life revolves around the routines and rites of the family kitchen. Before upending things, or even tampering at the margins with such an integral realm of people's world, it behooves development workers to absorb the scene through the eyes of their clients. Local context needs to inform not only the size and shape of a kitchen sink, but how and where it will be mounted, where it can be drained, and how it will actually fit into the workflow of traditional kitchen tasks.
Parachuting in with off-the-shelf sink and drain setups, while theoretically possible, would give short shrift to those context questions. Not to mention, it was always going to be prohibitively expensive if we ever hoped to scale up to include every household in the village.
 |
| US $125 (transportation not included) |
If we could come up with a sink and drain system that local workers could fabricate on site there would be several obvious and important advantages, with reduced cost being only the most easily quantified.
 |
| bounty from the sea |
On Maewo, among the resources that come from the sea, are the nets and floats that break away from commercial fishing boats in the South Pacific and wash up on the east side of the island. The big spherical plastic floats, when split in two, provide the ubiquitous basins that are used in virtually every kitchen throughout the island. The common setup is to use two of these basins, with the idea that you wash hands and dishes in one basin and rinse in the other. Buckets of water are carried in from the nearest tapstand to fill the basins and then eventually they're carried outside for dumping.

From my experience building water storage tanks I knew that ferrocement techniques could be adapted to build durable sinks. It would just be a matter of working out construction details to use locally available tools and materials, and importantly, designing a sink that would fit into the context of the local kitchen. We made a prototype using one of the traditional float basins itself as a mold for casting the sink. The familiar size and shape of the resulting sink seemed hard to improve on. The new kitchen tap could run to the new sink, and the traditional basins could be used along side it in much the same way as before, but with the attendant advantages of having running water and drainage right beside them.
The sink would have to be able to withstand the accidental blows and abuse that are bound to occur and it would be important that it wasn't too complicated to build. It's that final aspect of our design that has the most need for improvement (as you'll see if you keep reading). Despite that though, and acknowledging that it's a work in progress, I'll explain the details of our approach.
 |
| Applying final plaster to a sink. |
The sinks were made by plastering layers of a rich sand-cement mortar over the mold, with a mesh of wire reinforcement imbedded between the layers and with a tailpiece cast in for connecting to a drain line.
The tailpiece for the drain is cast into the sink as the the mortar is applied so it has to be made first. Begin with with a short length of 32 mm poly pipe and thermoform a deep socket on one end. (The technique of thermoforming poly pipe is described in this earlier post). Next make a series of saw-blade-depth cuts across the mouth of the socket as shown below.

Slightly heat the tabs over a candle flame to soften the plastic enough to bend each one back and create a flared, petal-like mouth on the socket. Before you heat the tabs though, push a second piece of 32 mm poly pipe tightly into the socket and leave it in place until the tabs cool. This will ensure that the mouth of the socket remains round.

When it has cooled down, cut that second pipe off at about a quarter-inch past flared mouth of the socket. That will leave you with a short stub that sticks out from the socket. That stub is going to be attached to the mold as shown in the photo below. The stub will serve to hold the tailpiece in place while you apply the cement mortar to the mold. You can attach the stub to the mold by drilling two holes in the mold and two holes in the stub. Then you can loop a wire through the stub and twist-tie it on from the underside of the mold to fasten it on tightly.
 |
| drain stub attached to mold |
With the stub held in place, you'll be able to push the tailpiece onto it, positioning the flared "ears" a quarter inch above surface of the mold. That way, when you plaster over the mold you can force mortar all around the flared opening and securely encase the tailpiece in the sink.
It would be possible to make a sink like this without any wire reinforcement and it would be way, way easier, but we didn't want to take a chance on the durability of a non-reinforced design given the likelihood of occasional impact, such as accidentally banging the sink with a heavy cooking pot. The scheme we've developed for making the reinforcing mesh is the overly complicated part, and as I said, a work in progress. Chicken wire is often used in ferrocement projects but it wasn't readily available. Instead we relied on rolls of "straight" wire of 16 gauge and 18 gauge, which can be affordably purchased in the capital and easily carried to an outer island like Maewo.
The technique we've found to work best is to create a cage of 18 gauge wire by wrapping the wire onto the mold itself before ever mixing any cement.

This cage, along with the tailpiece is then removed and a first coat of mortar is applied to the mold.

After a couple of hours, when the mortar has begun to set, the cage is put back in place and a second coat of mortar is applied, generously covering all of the wire.


It's ideal to have a piece of thin material such as masonite or plywood for a template. Trace around the mold and then draw a wider circle that marks the desired thickness of the sink's rim (approximately one inch). Then draw a third circle half way between the first two (the dotted line in the picture above). That middle circle is the size of the hoop of wire that will reinforce the rim.
To make the hoop stiff enough we usually twisted together two long strands of the heavier 16 gauge wire and then joined the ends. You must get this hoop exactly the right size, so calculate the length (circumference) by multiplying 3.14 times the diameter.
This outer hoop of twisted wire also has to anchor all of the vertical wires. To provide the anchor points we added a loop of the thinner 18 gauge wire every two inches around the outer hoop.
We added those loops by first taking a long piece of the 18 gauge wire and twisting a loop in it every two inches. Then we just spiraled that wire with its loops around the outer hoop all the way around. The finished hoop and loop assembly looks like this.

To hold the assembly in place we poked holes in the template and then laced the assembly down onto the template with twine.
Next set the mold in the center of the template and push the tailpiece tightly onto the stub. Start wrapping 18 gauge wire from the perimeter loops, up and all the way around the tailpiece and back down and through the next loop over.
Keep everything snug as you wrap and lace the wire onto the mold. You'll only be able to work with pieces of wire a couple of meters long, so splice on more wire as needed and continue all the way around the mold.
Once you have the vertical wires tied off, you can run another piece of 18 gauge wire around through the loops to create a second horizontal hoop. (as can be seen in the fourth photo below)

To keep the wire from loosening, it's helpful to secure the bundle of wires where they wrap around around the tailpiece. The best way we found to do that is to make a short tie of thin wire to run behind the bundle of wires and twist-tie the them together as seen in the next photo.

With the cage now prepared, untie the string holding it down to the template and pull the tailpiece loose from the stub. Remove the whole cage and tailpiece assembly and set them aside in a safe place.
Once you have applied the first coat of mortar to the mold you're going to be putting the cage back on and applying a second coat of mortar over it as seen in the above photo. We found that the wire cage tended to stand out a bit too much from the mold, so we used string to hold the cage down. Again, it makes things more complicated, and this could be considered optional, but I'll explain what we did.
We used another piece of masonite as the work surface for actually building the sink. Again we traced the outline of the mold and drew another circle at least an inch wider in radius to mark the desired thickness of the sink's rim.
We drilled holes at 12, 3, 6, and 9 o'clock just outside the rim of the mold. We then pulled four strings from below the table, knotted on the bottom end. That left a two-inch tail of twine sticking out from the work surface at each spot. You can see the exposed twine in the photo below.
Before you start to plaster, rub cooking oil onto the mold and onto the work surface around the perimeter. Set the mold in the center.
Wrap a strip of wet newspaper around the drain stub as seen in the photo below and oil the paper too.
You also need to add a thin strip of wet newspaper around the bottom edge of the mold. The paper should overlap the edge of the mold and the work surface. The paper will prevent mortar from seeping under the mold which would block you from separating the mold from the sink when the mortar hardens.

The mortar is a 1:2 cement to sand mix. Beach sand should be thoroughly rinsed to remove salt and it should be sifted through window-screen-sized mesh. Use only fresh cement and screen out and discard any lumps. Dry-mix the sand and cement thoroughly before adding just enough water to make a smooth, workable mix. Mix in small batches that will be used within half an hour.
As shown above, work up from the bottom, smearing the mortar onto one small section at a time as you move systematically around the mold. Apply a thicker coat of mortar around the rim, but overall you should aim for a consistent layer of at least 1/4 inch.
Try to not leave any thin areas. Press the mortar firmly onto the mold all around using short, upward strokes of the trowel.
Don't leave any seams, but avoid going over and over the same area with the trowel. You do not want to give this first coat a particularly smooth finish.
At the perimeter be sure to consistently compact the mortar down onto the oiled work surface while keeping it within the outer circle.
In early prototypes we made a ring of clay to provide a form for the rim (seen in the photo below), but that proved unnecessary. It's easy enough to shape the rim with a trowel.
As you work the rim, make sure that your four tails of string remain accessible and are sticking out of the mortar as can be seen in the photo above.
When you reach the top of the mold, make sure you've got that strip of oiled newspaper covering the tailpiece stub and run the plaster right against the paper, keeping the mortar just 1/4 inch thick.
When you're satisfied that the first coat is good, clean up your tools and take a break.
 |
| applying the second coat of mortar |
After two hours or so, when the mortar has set but is still very moist, carefully set the cage in place, pushing the tailpiece down onto the stub while leaving the newspaper in place to keep cement from sticking to the stub. Gently snug the cage down onto the mortar surface and use the strings you left sticking out of the first coat of mortar to pull the outer hoop of the cage down and hold it in place
The second coat is the same 1:2 cement-sand mix. Again work up from the bottom, consistently applying another roughly 1/4 inch layer of mortar overall, but again, thicker at the rim. Press the mortar on quite firmly.
You will need to add some thickness in spots in order to get good coverage over any wires that are close to the surface of the mortar. When in doubt, add more mortar.
When you reach the top take extra care to force mortar under the flared tailpiece and all around the paper-covered stub. Generously cover the flared ears, and run mortar at least an inch up onto the tailpiece
You can take extra time to go back and add mortar and smooth the surface to your liking. Watch for any wires coming to the surface and generously add mortar to cover them. Also add mortar to bulk up the rim and smoothly round it over to the desired width as drawn on your work surface.
 |
| Another successful hunt. |
After a couple of hours, when the second layer of mortar has set, loosely cover the whole thing with a plastic bag. The following day, lift the plastic and put some wet cloths on the sink and cover it again with the plastic bag. It's very important to keep the sink wet like that for at least a week to ensure it develops maximum strength.
After the first three days you can de-mold the sink. Snip off the four strings tied below the table and the sink and mold will slide loose from the work surface. Check around the underside of the rim and break away any bits of mortar that might have seeped under the mold and that would block the mold from coming out.
To release the mold you can use a piece of 25 mm pipe that is just slightly longer than the tailpiece. With the sink upside down on the table, slide the 25 mm pipe into the tailpiece until you feel it hitting the top edge of the stub. Hold it there while you grasp the tailpiece and lift the sink slightly. Then tap on the end of the 25 mm pipe with a hammer to drive the stub out of the tailpiece and separate the mold from the sink.
With the mold removed, clean up any sharp edges around the rim by tooling it with something like a rasp.
You can apply a seal coat of cement paste to the inside of the bowl. Put about a quarter cup of water in a cup and gradually stir in screened cement powder until it reaches tooth paste consistency. If you don't have rubber gloves you can use a plastic bag as a mitten and rub the paste into the sink's inner surface. Then put it back in the plastic bag with the wet rags for the rest of the week.

The location of the sink in the kitchen will depend in part on where the drain line can be run, but by using thermoformed sockets and bends you can readily customize the drain line using the same 32 mm poly pipe as the sink's tailpiece (see details on the drain in this related post).

A simple install of the sink will only require a secure stand or counter structure with an opening that the sink can be set down into. It won't even need to be fastened down.
The tap can be installed high enough above the sink to allow for filling the largest cooking pots as well as the companion basins the family will be using.
 |
| Early kitchen sink adopters |
The local preference has been to use the old basins for the customary soaking and washing of dishes. The basins can be filled and emptied at the sink, while still leaving the sink and tap available for drawing water, washing hands, and other kitchen tasks.
Sometimes users may want to fill the sink itself with water. For those times, it is very simple to make an effective stopper from a piece of 32 mm pipe and that will be the last procedure I'll describe in this post.
To make a stopper, heat the end of a piece of 32 mm pipe over a fire until it's extremely soft. Then lay that end down on one board and place a second board on top of it, flattening it and fusing the end closed. You can stand on the boards to squeeze them together tightly until the pipe is completely cool. Then cut off the other end of the pipe so that it's just long enough for you to push the stopper tightly into the tailpiece. You can shave a slight bevel on the open end of the stopper so it will slide in more easily. You may also need to rasp a slight bevel in the cement at the drain opening. When the stopper is pushed into the drain it will seal tightly inside the tailpiece because of the socket you made.
 |
| sink stopper hung on a nail above the sink. |
 |
| Peace. |